
Servicebio Chemiluminescence Imaging System
고감도 냉각 카메라(900만 픽셀)를 탑재한 화학발광 이미징 시스템으로 생명과학, 의학, 환경 연구에 적합. 실시간, 시간 누적, 자동 노출 기능을 통해 정밀하고 효율적인 이미지 획득 가능. 완전 차광형 다크박스와 지능형 소프트웨어로 안정적 실험 환경 제공.
✨AI 추천 연관 상품
AI가 분석한 이 상품과 연관된 추천 상품들을 확인해보세요
연관 상품을 찾고 있습니다...
Introduction
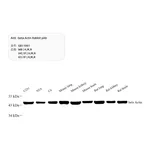
SCG-W3000은 화학발광(chemiluminescence) 기술을 활용한 이미징 장비로, 900만 픽셀의 고감도 냉각 카메라를 탑재하고 있습니다. 빠르고 정확하며 고처리량의 샘플 검출 및 이미징이 가능하여 생명과학, 의학, 환경 보호 등의 분야에서 널리 사용됩니다.
Features
- Real-time Imaging: 노출 과정 중 샘플 신호 변화를 실시간으로 표시하여 모든 세부를 포착. 과노출 영역은 표시됩니다.
- Time Imaging: 노출 완료 후 노출 시간 내의 모든 프레임 이미지를 생성하고, 원하는 프레임을 최종 결과로 선택 가능.
- Time Accumulation: 노출이 부족한 샘플은 노출 종료 후 추가 노출을 통해 누적 효과를 얻을 수 있습니다.
- Automatic Exposure: 지능형 노출 기술로 최적의 노출 시간을 자동 결정하며, 시간 이미징 및 누적 기능을 통해 한 번의 작동으로 최적 결과를 얻습니다.
Technical Specifications and Precautions
| 항목 | 세부 내용 |
|---|---|
| Product Name | Chemiluminescence Imaging System |
| Cat. No. | SCG-W3000 |
| Dimensions | 400mm × 371mm × 700mm |
| Camera Pixel Resolution | 9 million pixels |
| Resolution | 3000 × 3000 |
| Pixel Size | 3.76μm × 3.76μm |
| Target Size | 1" (11.28mm × 11.28mm) |
| Full Well Capacity | 16.5ke-(HCG), 50.5ke-(LCG) |
| Sensitivity | 877mv@1/30s |
| Readout Noise | 1.24e-(HCG), 3.22e-(LCG) |
| Dark Current | 0.0003e-/s/pixel@-15℃ |
| Signal-to-Noise Ratio | 42.2dB(HCG), 47dB(LCG) |
| Exposure Time | 0.1ms ~ 1h |
| Binning Mode | 1×1, 2×2, 3×3 |
| Grayscale | 16-bit (65536 levels) |
| Cooling | Ambient Temperature -40℃ |
| Camera Type | Black and White Camera |
| Lens Aperture | F0.95 - F16 |
| Focal Length | 17mm |
| Lens Type | Fixed Focus Lens |
| Light Source | LED white light (downward-facing, bilateral symmetric) |
| Dark Box | Fully light-sealed, isolates environmental light |
| Door Control | Sensor-controlled LED light on/off |
| Field of View | 136mm × 136mm (expandable to 200mm × 200mm) |
| Software Functions | Real-time imaging, time imaging, time accumulation, auto exposure |
| Industrial Computer | 10.4" display, 1024×768, Windows OS |
| External Interfaces | 2 USB 3.0 ports |
| Operating Voltage | 100V - 240V |
| Power | 100W |
| Net Weight | 25Kg |
Notes
- 내부 렌즈를 손이나 날카로운 물체로 접촉하거나 긁지 마십시오.
- 샘플을 넣은 후 반드시 도어를 닫아 외부광 유입을 방지하십시오.
- 실험 중 흔들림은 이미지 품질에 영향을 미치므로 금지됩니다.
- 전기 안전에 유의하고, 실험 중 전원 케이블을 당기거나 이동하지 마십시오.
- 실험 후 다크박스 내부를 깨끗이 청소하십시오.
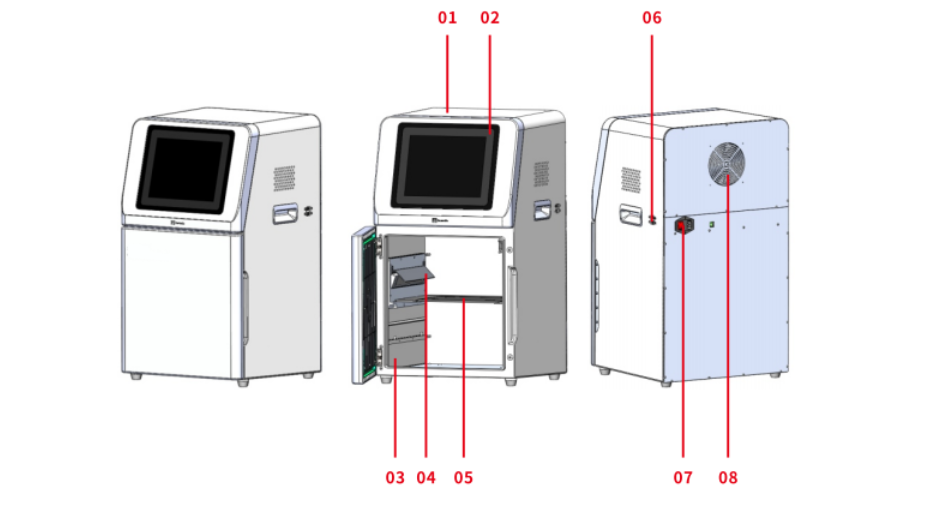
Functional Description
기기 구성 요소:
01 내부 카메라 렌즈 어셈블리
02 10.4인치 산업용 컴퓨터 (사용자 인터페이스 포함)
03 고품질 차광 다크박스
04 탈착식 샘플 트레이
05 LED 백색광 조명
06 전원 소켓 및 스위치
07 냉각 장치
08 외부 USB 3.0 인터페이스
Operating Procedures
1. Power On
전원 케이블을 연결하고 후면 스위치를 켜면 산업용 컴퓨터가 부팅됩니다.
2. Sample Loading
도어를 열고 트레이를 꺼내 샘플을 올린 후, 트레이를 장비 내부 홈에 맞춰 넣고 도어를 닫습니다.
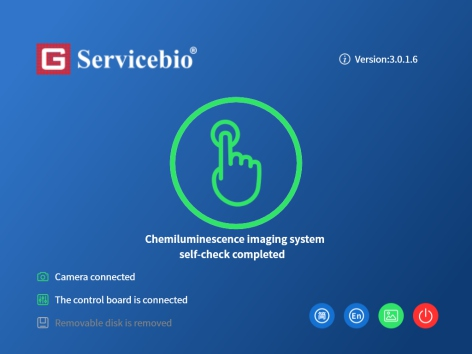
3. Launching the Chemiluminescence Imaging Software
컴퓨터 부팅 후 소프트웨어가 자동 실행됩니다.
좌측 상단: 회사 로고
좌측 하단: 상태 표시줄 (카메라, 제어보드 연결 상태, 이동식 디스크 감지)
우측 상단: 소프트웨어 버전
우측 하단: 언어 전환(중국어/영어), 페이지 내보내기, 프로그램 종료 버튼
중앙 아이콘 클릭 시 미리보기 및 촬영 페이지로 이동합니다.
OCR 텍스트 반영:
- Servicebio® Version: 3.0.1.6
- Chemiluminescence imaging system self-check completed
- 🟢 Camera connected / 🟢 Control board connected / ⚪ Removable disk removed
4. Software Self-Check
소프트웨어가 비정상적으로 시작되거나 카메라 또는 제어보드가 연결되지 않으면 텍스트가 회색으로 표시되고, 중앙 아이콘이 비활성화됩니다. 자가 점검 완료 표시가 빨간색으로 변하며, 미리보기 및 노출 페이지로 진입할 수 없습니다. 드라이버 설치 상태를 확인해야 합니다.
OCR 텍스트 반영:
- Servicebio® Version: 3.0.1.6
- Camera connected / Control board disconnected / Removable disk removed
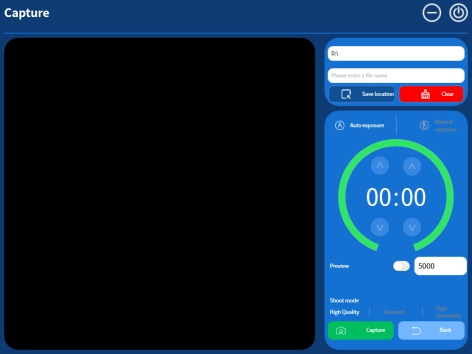
5. Preview and Capture Pages
파일 저장 위치 및 파일명을 입력합니다.
노출 모드는 수동/자동 중 선택 가능하며, 자동 모드는 알고리즘이 최적 노출 시간을 계산합니다.
촬영 모드: High Quality / Standard / High Sensitivity
미리보기 버튼으로 노출 시간을 조정하며, 캡처 버튼으로 촬영을 시작합니다.
OCR 텍스트 반영:
D:\
Please enter a file name
Save location
Auto exposure / Manual exposure
Preview
Shoot mode: High Quality / Standard / High Sensitivity
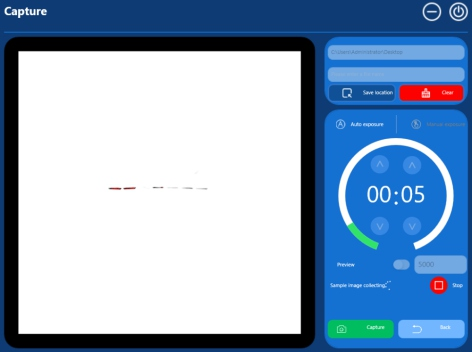
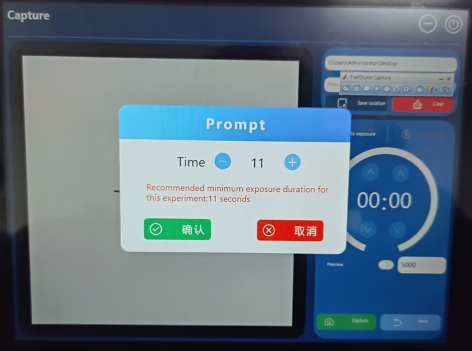
Capture / Back6. Capturing Process
- 자동 노출 선택 후 미리보기 시간 설정
- 캡처 버튼 클릭 시 노출 시작, 실시간 신호 변화 표시
- 과노출 영역은 빨간색으로 표시되며, 필요 시 조기 종료 가능
OCR 텍스트 반영:
Capture
C:\Users\Administrator\Desktop
Auto exposure / Manual exposure
00:05
Preview
Sample image collecting...
Capture / Back
7. Temporal Imaging & Accumulation
노출 완료 후 결과 페이지에서 시간별 프레임 선택 및 추가 노출 설정 가능.
- Time Imaging: 노출 시간 내 원하는 프레임을 최종 결과로 선택
- Time Accumulation: 추가 노출을 통해 누적 효과 부여
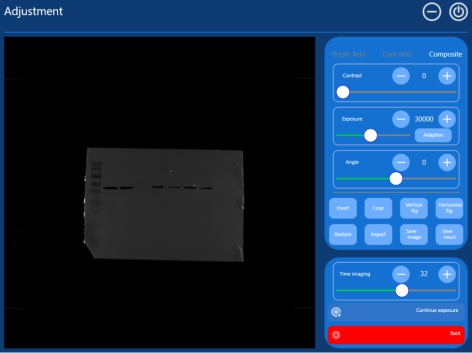
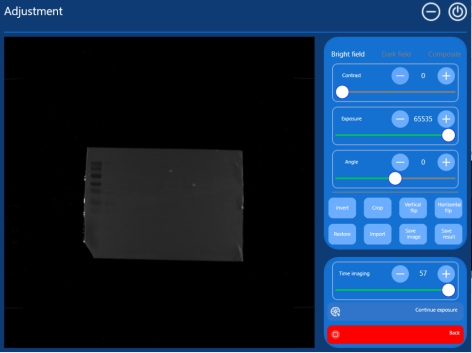
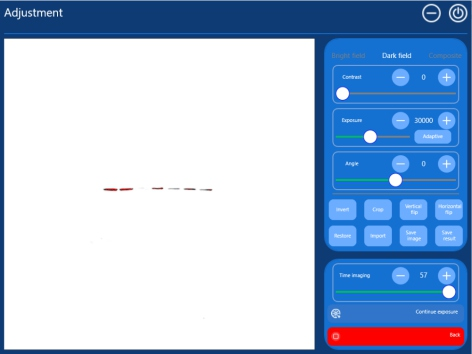
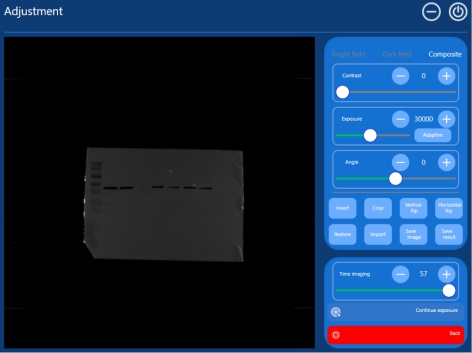
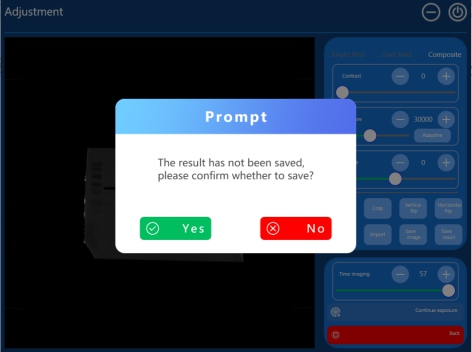
8. Image Adjustments & Result Saving
밝기, 노출, 회전, 반전, 크롭, 플립, 복원, 파일 가져오기, 이미지 저장, 결과 저장 기능을 제공합니다.
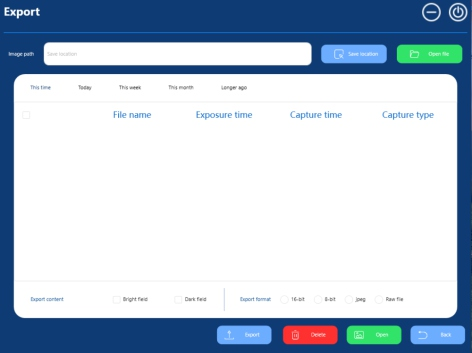
9. Export Page
이미지 파일 저장 위치 선택 및 목록 표시.
- Open file / Export / Delete / Open / Return 기능 제공
Related Products
Protein Biology Reagents | Consumables
Servicebio는 FDA 및 CE 인증을 받은 실험실 용품과 서비스를 제공하는 중국 선도 제조업체입니다.
제품 이미지


배송/결제/교환/반품 안내
배송 정보
| 기본 배송비 |
| 교환/반품 배송비 |
|
|---|---|---|---|
| 착불 배송비 |
| ||
| 교환/반품 배송비 |
| ||
결제 및 환불 안내
| 결제수단 |
|
|---|---|
| 취소 |
|
| 반품 |
|
| 환급 |
|
교환 및 반품 접수
| 교환 및 반품 접수 기한 |
|
|---|---|
| 교환 및 반품 접수가 가능한 경우 |
|
| 교환 및 반품 접수가 불가능한 경우 |
|
교환 및 반품 신청
| 교환 절차 |
|
|---|---|
| 반품 절차 |
|